Dust Academy
Welcome to the Dust Academy!
This material will walk you through SmartMesh IP, teach you what you can do with it and how to use it. The material is presented as a series of labs with questions.
These labs are regularly used as a hands-on addition to undergraduate and graduates courses on Internet of Things, or as stand-alone tutorials at conference, tradeshows or summer schools. All the material presented on this site is published under the same BSD open-source license as the source code, meaning that you are free to use all or part of it. If you do, we would appreciate if you could drop us a line at dustsupport@linear.com.
Are you an instructor?
If you are an instructor and want to use this material in your labs, let us know. There are pages visible only to instructors and which contain tips, as well as the answer to all questions. Drop us a line at dustsupport@linear.com so we can give your the right credentials to access that supplementary material.
Before you begin
Before you begin, make sure you have:
- a computer with Internet access
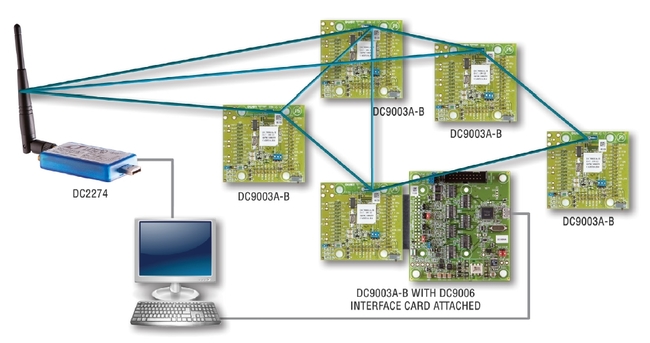
- a DC9000B SmartMesh IP Starter Kit
- 1x DC2274 SmartMesh IP Manager
- 5x DC9003A-B SmartMesh IP Motes
- 1x DC9006A Eterna Interface Card
- 2x Micro USB cables
During the labs, you will use this kit to create a wireless network, interact with the mote and manager over their Command Line Interface (CLI) and Application Programming Interface (API), connect external sensor and actuators, integrate your SmartMesh network into the Internet, etc.
All labs
- Lab 00. Things to Install
- Lab 01. Your First Network
- Lab 02. Navigating the Documentation
- Lab 03. Starter Kit Introduction Video
- Lab 04. Motes, managers and LEDs
- Lab 05. Serial Port Madness
- Lab 06. Network Identifier
- Lab 07. Ping your Motes
- Lab 08. Manager Statistics
- Lab 09. Join duty cycle — 30 min
- Lab 10. Performance estimator
- Lab 11. See The Mesh
- Lab 12. Running JsonServer+Node-RED
- Lab 13. Observe Networks Events
- Lab 14. Receive Health Reports
- Lab 15. receive temperature
- Lab 16. raw OAP temperature notifications — 15 min
- Lab 17. Control an LED and a buzzer
- Lab 18. raw OAP LED commands — 20 min
- Lab 19. A Simple OAP Node-RED Flow — 30 min
- Lab 20. OAP pkgen — 15 min
- Lab 21. Exploring the serial API — 30 min
- Lab 22. OAP GPIO get — 20 min
- Lab 23. Detect GPIO changes
- Lab 24. A Building Monitoring Solution — 60 min
- Lab 25. Switch to slave mode — 10 min
- Lab 26. Slave serial API — 10 min
- Lab 27. Searching for networks — 15 min
- Lab 28. Backbone mode — 40 min
- Lab 29. DustLink — 60 min
- Lab 30. Publish to Clouddata — 10 min
- Lab 31. Crash-course on MQTT
- Lab 32. Publish/Subcribe with MQTT
- Lab 33. MQTT Control Loop
- Lab 34. A Canopy Network Coordinated over MQTT — 20 min
- Lab 35. Starting Node-RED on IBM Cloud — 10 min
- Lab 36. Registering to all events — 10 min
- Lab 38. Installing Node-RED dashboard
- Lab 39. Dashboard: temperature
- Lab 40. Dashboard: LED
- Lab 41. Dashboard: buzzer
- Lab 42. Dashboard: reed switch — 20 min
- Lab 43. Dashboard: analog input — 20 min
- Lab 44. Half-Day Unplugfest!
- Part 0a: Things to prepare before the session — Things to install on your computer and on your IBM Cloud instance before coming to the session.
- Part 0b: Getting Started! — Overview of the hardware you will be using, and of the general organization of the unplugfest.
- Part 1: Your First Standalone Network — Build your very first network, understand how the LEDs indicate the state of the motes, issue simple CLI commands on the manager, understand the use of the netid.
- Part 3: A Canopy Network Coordinated through IBM Watson IoT — How the canopy network, which is already deployed in your building works.
- Part 2: Understanding Trade-Offs in SmartMesh IP — Understand how latency, data rate and energy trade off for one another.
- Part 4: Interact with Sensors and Actuators — Connect sensors and actuators to your mote, and interact with them from your Node-RED instance in the IBM Cloud!
- Part 5: Programming Challenge — Once you have completed Part 4, sky is the limit. Explore a couple of possibilities where to go from there.
- Lab 45: Ring of Things
- retired
- Lab 11. OAP GPIO set [1/2] — 30 min
- Lab 15. Subscribe to notifications — 5 min
- Lab 31. JsonServer+Node-RED — 60 min
- Lab 37. Receiving temperature data — 10 min
- Instructors Requirements
Per-label labs
Each lab is labeled as either "basic", "master mode", "slave mode", "Internet" or "advanced".
How to read this material
We recommend you go through the "basic" labs first, then pick one of more other categories of labs.
If you want to do everything, just follow the labs in order.
