SmartMesh IP and Node-RED [outdated]
- Thomas Watteyne
Node-RED is fun little tool from IBM Research to "wire up the IoT". We show how you can use it to interface it to your SmartMesh IP network without writing a line of code!

This recipe is outdated and replaced by SmartMesh IP and Node-RED, revisited.
Overview of Node-Red
Node-RED is fun tool from IBM Research to "wire up the IoT". It's a little program you launch of your computer, which allows you link inputs (sensors, etc.) to outputs (actuators, files, Twitter feeds etc) through a web-based graphical interface.
SmartMesh IP and Node-RED are a perfect match. I'll show you a couple example in this tutorial. You will be using off-the-shelf applications from the SmartMesh SDK; you won't even have to write a line of code!
Requirements
To replicate this tutorial, you need to have:
- a SmartMesh IP starter kit
- a computer
We assume the motes are running the default firmware, in Master mode.
We assume the manager is connected your computer over USB, and that all the motes are switched on and have joined the network.
We assume you have downloaded the SmartMesh SDK, and are comfortable enough with it that you can launch different applications.
Installing Node-RED
The first step is to install Node-RED.
- First, install Node.js. There a number of options. On my Windows machine, it just means downloading an installer and clicking through the default installation options.
- You can verify Node.js is installed by entering the following command (
npmis the "node package manager", part of Node.js)
C:\Users\twatteyne>npm --version
2.15.9
- You install Node-RED through
npm:
sudo npm install -g --unsafe-perm node-red
- Finally, you can start Node-RED:
C:\Users\twatteyne>node-red


Welcome to Node-RED
===================

1 Sep 15:02:04 - [info] Node-RED version: v0.14.6
1 Sep 15:02:04 - [info] Node.js  version: v4.5.0
1 Sep 15:02:04 - [info] Windows_NT 6.1.7601 x64 LE
1 Sep 15:02:04 - [info] Loading palette nodes
1 Sep 15:02:05 - [warn] ------------------------------------------------------
1 Sep 15:02:05 - [warn] [rpi-gpio] Info : Ignoring Raspberry Pi specific node
1 Sep 15:02:05 - [warn] [tail] Not currently supported on Windows.
1 Sep 15:02:05 - [warn] ------------------------------------------------------
1 Sep 15:02:05 - [info] Settings file  : C:\Users\twatteyne\AppData\Roaming\npm\
node_modules\node-red\settings.js
1 Sep 15:02:05 - [info] User directory : \Users\twatteyne\.node-red
1 Sep 15:02:05 - [info] Flows file     : \Users\twatteyne\.node-red\flows_HDC_SW
01.json
1 Sep 15:02:05 - [info] Creating new flow file
1 Sep 15:02:05 - [info] Starting flows
1 Sep 15:02:05 - [info] Started flows
1 Sep 15:02:05 - [info] Server now running at http://127.0.0.1:1880/
- Point your browser to http://locahost:1880/ to see the Node-RED web interface:
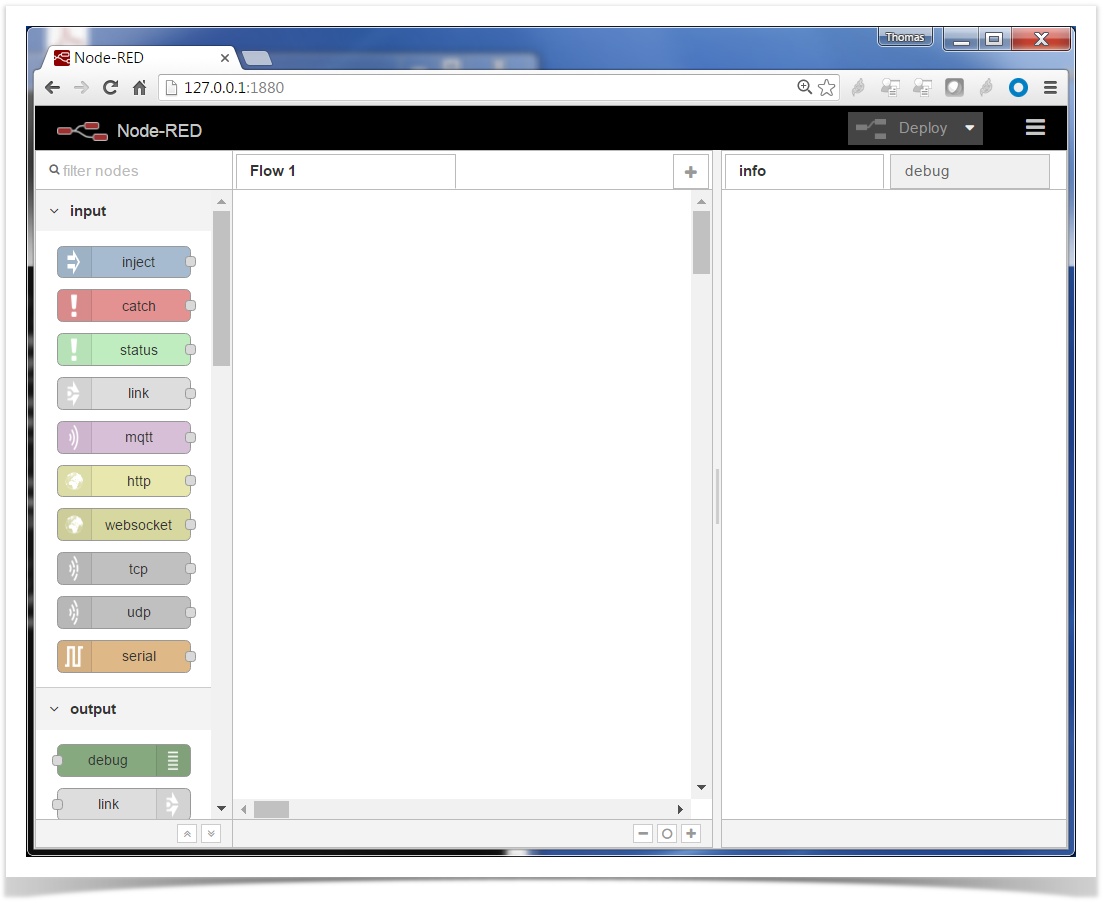
Following the excellent Getting Started guide if you want to learn more about Node-RED.
Receiving temperature data on Node-RED
Our first Node-RED "flow" (the connections between inputs and outputs, in Node-RED parlance) is to receive temperature data generated by SmartMesh IP motes directly in Node-RED. We will use for that the PublishToWeb sample application of the SmartMesh SDK.
Start the PublishToWeb SmartMesh SDK sample application
The PublishToWeb sample application is part of the SmartMeshSDK.
Before launching the PublisToWeb application, edit PublishToWeb.py and replace the SERVER_HOST and SERVER_PORT variables by:
SERVER_HOST        = 'localhost'
SERVER_PORT        = '1880'
This makes sure the application will publish to the Node-RED instance running locally on your computer.
You can now launch the PublishToWeb application, and connect it to the serial API port of your SmartMesh IP Manager, COM31 in my case:
PublishToWeb - (c) Dust Networks
SmartMesh SDK 1.0.8.142

SmartMesh IP manager's API serial port (leave blank for COM7): COM31
Connected to COM31.

sent mac=00-17-0d-00-00-38-05-da temperature=21.79C
sent mac=00-17-0d-00-00-38-03-ca temperature=23.29C
sent mac=00-17-0d-00-00-38-04-35 temperature=22.65C
sent mac=00-17-0d-00-00-38-05-da temperature=21.79C
sent mac=00-17-0d-00-00-38-03-ca temperature=23.50C
sent mac=00-17-0d-00-00-38-04-35 temperature=22.86C
sent mac=00-17-0d-00-00-38-03-ca temperature=23.72C
sent mac=00-17-0d-00-00-38-05-da temperature=22.00C
You will see a line print each time the application receives a temperature reading from one of the motes.
Creating the Node-RED flow
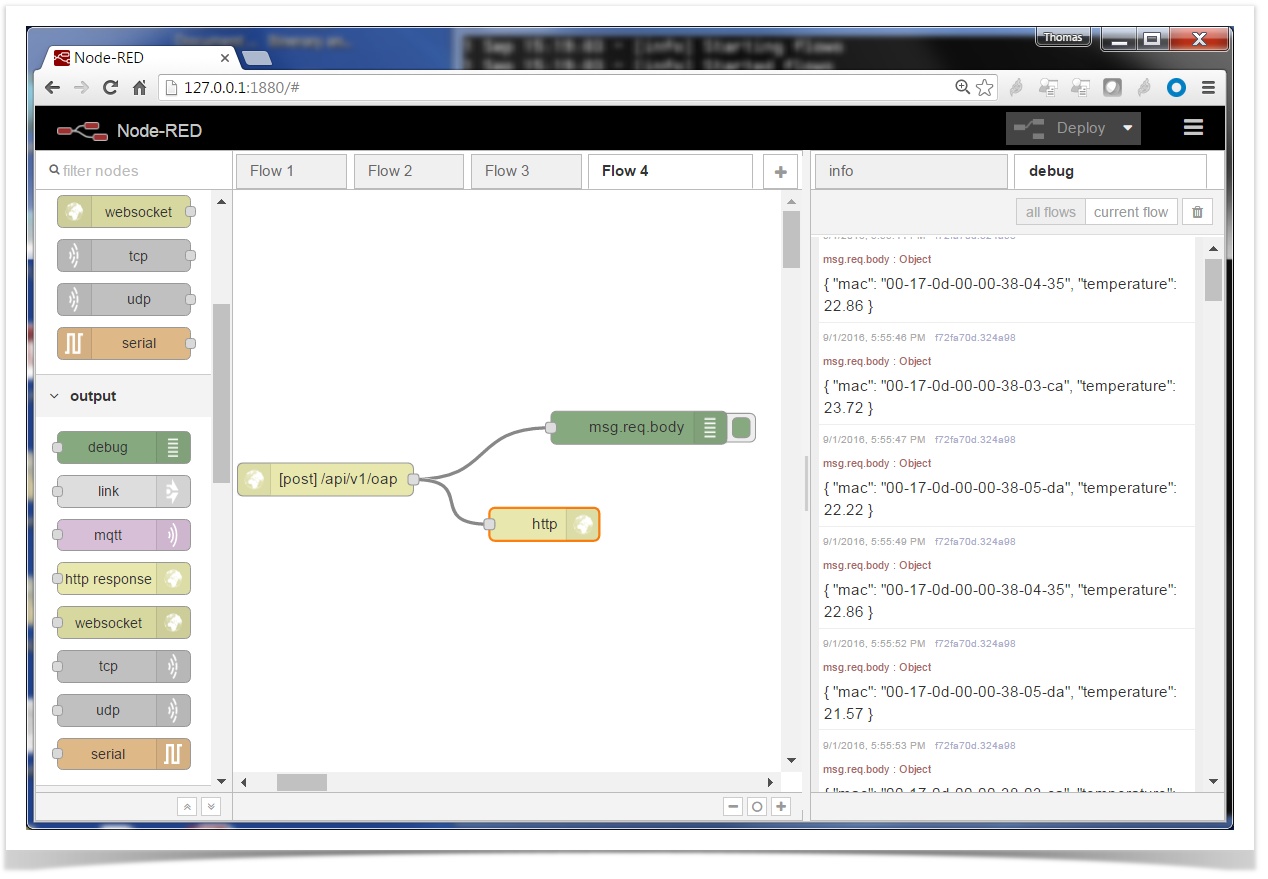
Drag and drop the following "nodes" to build the following flow:
- an "http" node, double-click on it to set:
- "Method" to "POST"
- "URL" to "/api/v1/oap"
- an "http response" node
- no further configuration needed
- an "debug" node, double-click on it to set:
- "Output" to "msg.req.body"
Create the following links:
- between the "http" and "debug" nodes
- between the "http" and "http response" nodes
Click the "Deploy" button to activate this flow. In the debug tab on the right, you see the temperature appear each time one of the mote publishes.
Congratulations! You now have successfully published data into Node-RED. Now that the data is there, sky is the limit: you can publish that data live on Twitter, log it into a file, publish it over MQTT, publish it to a webpage through a websocket, etc.
The following code is the textual representation of the Node-RED flow above. You can simply paste this in the "Import > Clipboard" utility in Node-RED:
[{"id":"800ce651.8f7898","type":"inject","z":"4e9083b3.53976c","name":"led on","topic":"","payload":"1","payloadType":"num","repeat":"","crontab":"","once":false,"x":134.13352966308594,"y":211.97726440429688,"wires":[["b37b4d77.dd1b1"]]},{"id":"b79f9dbc.87d2a","type":"http request","z":"4e9083b3.53976c","name":"","method":"POST","ret":"txt","url":"http://127.0.0.1:8080/","tls":"","x":552.1447601318359,"y":275.53692626953125,"wires":[[]]},{"id":"b37b4d77.dd1b1","type":"function","z":"4e9083b3.53976c","name":"","func":"msg.headers = {\n \"Content-type\" : \"application/json\"\n}\nmsg.payload = {\n \"mac\": \"00-17-0D-00-00-38-03-ca\",\n \"state\": msg.payload\n}\nreturn msg;","outputs":1,"noerr":0,"x":336.1334991455078,"y":283.875,"wires":[["b79f9dbc.87d2a"]]},{"id":"74496dc3.b9f754","type":"inject","z":"4e9083b3.53976c","name":"led off","topic":"","payload":"0","payloadType":"num","repeat":"","crontab":"","once":false,"x":141.1420440673828,"y":364.9715881347656,"wires":[["b37b4d77.dd1b1"]]}]
Blinking LEDs from Node-RED
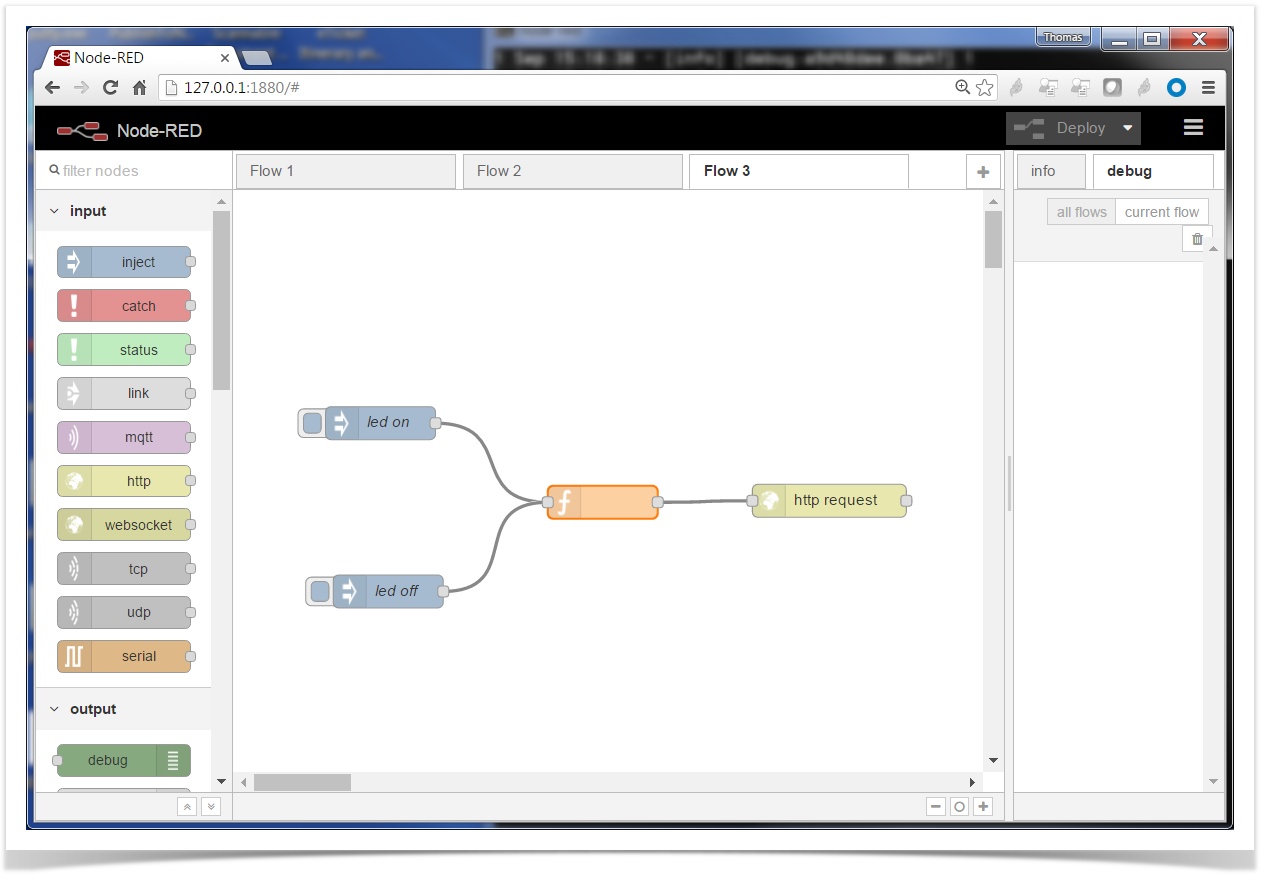
The goal of this Node-RED flow is to toggle the mote's LED by click on the Node-RED interface:
Start the JsonServer SmartMesh SDK sample application
The JsonServer sample application is part of the SmartMeshSDK.
JsonServer - SmartMesh SDK 1.0.8.142 (c) Dust Networks

serial port of SmartMesh IP Manager (e.g. COM15): COM31
ok. connected to manager at COM31
ok. JSON server started on port 8080
Create the Node-RED flow
Drag and drop the following "nodes" to build the following flow:
- a first "inject" node, double-click on it to set:
- "Payload" to "number" and "1"
- "Name" to "led on"
- a second "inject" node, double-click on it to set:
- "Payload" to "number" and "0"
- "Name" to "led off"
a "function" node, double-click on it and set the code to:
msg.headers = { "Content-type" : "application/json" } msg.payload = { "mac": "00-17-0D-00-00-38-07-01", "state": msg.payload } return msg;- an "http request" node, double-click on it to set:
- "Method" to "POST"
- "URL" to "http://127.0.0.1:8080"
Create the following links:
- between the first "inject" and "function" nodes
- between the second "inject" and "function" nodes
- between the "function" and "http request" nodes
Click the "Deploy" button to activate this flow. You can now on the "led on" and "led off" nodes to change the state of the blue LED of your DC9003 mote.
On your DC9003 mote, make sure the "LED EN" jumper is closed.
The following code is the textual representation of the Node-RED flow above. You can simply paste this in the "Import > Clipboard" utility in Node-RED:
[{"id":"51558b9b.062cd4","type":"http in","z":"f29e7b87.9fe988","name":"","url":"/api/v1/oap","method":"post","swaggerDoc":"","x":313.13633728027344,"y":263.14202880859375,"wires":[["f72fa70d.324a98","17fc38a7.92de37"]]},{"id":"f72fa70d.324a98","type":"debug","z":"f29e7b87.9fe988","name":"","active":true,"console":"false","complete":"req.body","x":598.1391754150391,"y":216.09942626953125,"wires":[]},{"id":"17fc38a7.92de37","type":"http response","z":"f29e7b87.9fe988","name":"","x":512.1420135498047,"y":303.9090881347656,"wires":[]}]
Where next?
This tutorial has shown you how to send data from your SmartMesh IP network into Node-RED, and from Node-RED into your SmartMesh IP network.
These are the only building blocks you need to integrate SmartMesh IP and Node-RED.
You now have an infinity of possibilities for building applications which publish to different back-end solutions, create complex triggers in a home-automation system, connect sensors to actuators, etc.