BeagleBone Black as SmartMesh Gateway
- Thomas Watteyne
Step #1: Plug in BeagleBone vis USB
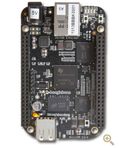
The BeagleBone Black (BBB) comes with one BBB board and a USB mini B cable.
Using the mini B USB cable, plug the BBB into your computer.
The PWR LED should be lit steadily. Within 10 seconds, the other LEDs will begin to blink in their default configurations.
The BBB will appear as a removable storage device on your computer. Open the device's folder and find the documentation START.htm.
Step #2: Install drivers on your computer
Following the instructions on START.htm (also available at http://beagleboard.org/getting-started) and install the drivers for your computer.
The BBB's web server is accessible through your browser at http://192.168.7.2.
Step #3: Get latest image
Following the instructions on START.htm update the image on the board if needed.
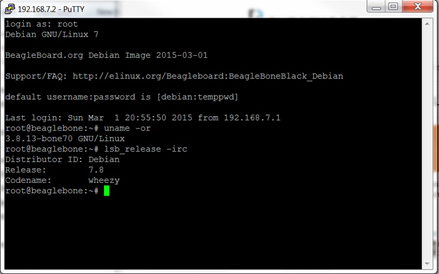
To find out what is currently running on the BBB log into the board through an SSH connection. For this example we used PuTTY.
- IP Address: 192.168.7.2
- Port: 22
- Login:
root - Password is 'blank'. Just hit <enter> a second time.
Note that older versions of the BBB shipped with an Angstrom Linux distribution. The instructions below assume you have updated to a Debian image. Instructions for updating can be found on the BeagleBoard website.
Query the Linux version information by using
uname –or
and
lsb_release –irc
Step #4: Share your PC's internet connection
To make it easy to update and get additional Linux packages enable internet sharing with the BBB.
For Windows 7:
- Control Panel/Network and Internet\Network and Sharing Center
- Click on your operating internet connection ("Local Area Connection") to get its status
- Select: Properties/Sharing and enable "Allow other network users to connect…"
- Under "Home networking connection": Select the BBB's Local Area Connection #
- Click OK
Windows will now allow the BBB to share access, but unfortunately it automatically assigns a static IP to the BBB connection. The next step is to restore the BBB's IP address to 192.168.7.2.
You might notice your SSH connection dropped when the new IP address was assigned.
- Control Panel\Network and Internet\Network and Sharing Center
- Click on your BBB internet connection ("Local Area Connection #") to get its status box
- Select Properties
- Click Internet Protocol Version 4 (TCP/IPv4), Click Properties
- Click "Optain an IP address automatically"
- Click "Obtain DNS server address automatically"
- Click OK. Click CLOSE.
Reconnect to the BBB using the SSH and enable the BBB to route Internet traffic through the host (Windows 7 in this case) and DNS through Google's DNS server (8.8.8.8).
route add default gw 192.168.7.1
echo "nameserver 8.8.8.8" >> /etc/resolv.conf
This would need to be done for each BBB restart. To make it persistent, add these commands to the Ethernet startup script on the BBB (/usr/bin/g-ether-load.sh).
The commands below must go before the udhcpd starts. You CANNOT add them to the bottom of g-ether-load.sh.
/sbin/ifconfig usb0 192.168.7.2 netmask 255.255.255.252
/sbin/route add default gw 192.168.7.1
echo 'nameserver 8.8.8.8' >> /etc/resolv.conf
/usr/sbin/udhcpd -f -S /etc/udhcpd.conf
Step #5: Install DustLink Web Server Gateway Interface
Using some form of file transfer (e.g. WinSCP) put the DustLink software onto the BBB (dustlink-master.zip) and uncompress it onto the BBB.
This release of Linux does not come with "unzip" package. You need to install the package called 'unzip'. From your root login, type the following command to get the package list updated:
sudo apt-get update
If this is the first time you are running this command, it will download something like 20 MB of data.
(optional) Type the following command to install the updates.
sudo apt-get upgrade
Install the package unzip by typing:
sudo apt-get install unzip
Unzip the Dustlink WSGI by typing:
unzip dustlink-master.zip
Step #6: Install any missing Python packages
The BBB comes with Python and pip already installed, but the Dustlink documentation describes 4 additional python packages that are needed in order to run:
pyserialgdataPyDispatcherxively-python
pyserial should already be installed on the BBB, but it doesn't hurt to confirm.
Install these packages by issuing:
pip install pyserial
pip install gdata
pip install PyDispatcher
pip install xively-python
Step #7: Modify the DustLink WSGI default Port
DustLink expects to run its server off of port 8080. Unfortunately on the BBB this is already being used by Debian. So modify the port for DustLink to be something like 8081.
Edit the following file on the BBB:
<base dir>/dustlink-master/views/web/dustWeb/DustWeb.py
(Around Line 214) Change to read:
self.webserver = web.httpserver.WSGIServer(('0.0.0.0', 8081), self.wsgifunc)
Save the file.
Step #8: Launch and connect to DustLink
On the BBB run DustLink.
cd <base dir>/dustlink-master/bin/dustLinkFullWeb
python dustLinkFullWeb.py
You should see the response:
Dust Link - (c) Dust Networks
>
DustLink is now running on the BBB.
Step #9 Connect via Browser and connection an IP Manager
You should now be able to follow the normal DustLink instructions and perform the regular operations as described.
To connect to DustLink you will need to specify "192.168.7.2:8081" in your browser.
Connecting an IP Manager to the BBB USB host port should be detected and accessible through DustLink.
You can still access the BBB's regular web server using "192.168.7.2".