Setting up a new project
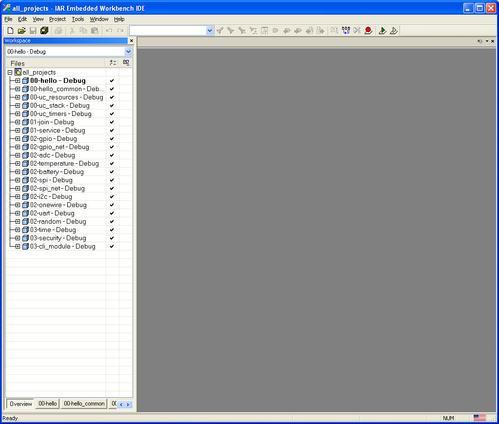
Using the Provided Workspace
Projects in IAR are organized as follows:
- Each project has corresponding
.ewdand.ewpproject files associated with it. - A
.eww"workspace" file groups different projects together.
On-Chip Software Development Kit
are grouped in theonchipsdk/
projects/iar/all_projects.eww workspace.Create a New Project
All the projects shipped in the
On-Chip Software Development Kit
have been set up. We recommend you use those projects when exploring the different sample applications. You only need to follow the steps below when creating a project from scratch.
OCSDK revisions <= 1.1.0.8 include IAR 6.x projects. Starting with OCSDK 1.2, it will included IAR 7.x project files, which are not compatible with a 6.x environment. If you are using a 6.x environment, you may need to set up project files manually, as described below.
We assume your project is entitled myProject.
- Create the directory structure:
- Create the following directories:
onchipsdk/src/app\myProject\to hold the your project's source codeonchipsdk/projects/iar/myProject\to hold the IAR project files
- Place the source code of your project in
onchipsdk/src/app\myProject\. Typically, the source code consists of one of more C files, optionally header files, and theapp_task_cfg.hheader file.
- Create the following directories:
- Create the IAR project:
- Open IAR
- Select Project, Create New Project...
- In the Create New Project dialog:
- Tool Chain: ARM
- Project templates: C > main
- Click OK
- give your
.ewpproject file a name (e.g.myProject.ewp)
- Remove the
main.cfile created by default:- In the right pane, right-click on the main.c tab and select Close.
- In the project structure on the left, right-click on main.c and select Remove; click Yes to confirm.
- In your project directory (e.g.
onchipsdk/projects/iar/app\myProject\), delete themain.cfile.
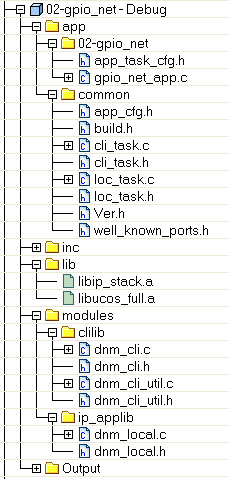
- Right-click on the project and use the Add > Add Files... and Add > Add Group... entries to add and organize the source code files. Typically, the project contains:
- In the app/myProject group, the source code of your application, taken from the
onchipsdk/src/app\myProject\directory. - In the app/common group, the source code of the helper modules, taken from the
onchipsdk/src/app\common\directory. - In the inc group, the header files associated with the library, taken from the
onchipsdk/src/inc\directory. - In the lib group, the pre-compiled libraries
libip_stack.aandlibucos_full.a, taken from theonchipsdk/src/lib\directory. - In the modules group, the source code of the modules taken from the
onchipsdk/src/modules\directory. - The image below show the resulting structure of a typical project "02-gpio_net"
- In the app/myProject group, the source code of your application, taken from the
- Configure the IAR project:
- Select the new project in the Workspace view on the left by clicking on it. From the main menu select Project > Options...
- In General Options
- In the Target tab:
- Core: Cortex-M3
- In the Library Confrguration tab:
- Set the Library low-level interface implementation to None.
- In the Target tab:
- In C/C++ Compiler:
- Optimizations tab:
- Set Level to High
- Select Balanced
- Preprocessor tab:
List the location of your header files in the Additional include directories text field, one per line.
$PROJ_DIR$is an IAR macro which corresponds to the directory containing the project's.ewpfile. A typical configuration is (<your_app_dir>refers to the directory containing the source code of your application):$PROJ_DIR$\..\..\..\src\app\<your_app_dir>\ $PROJ_DIR$\..\..\..\src\app\common\ $PROJ_DIR$\..\..\..\src\inc\ $PROJ_DIR$\..\..\..\src\modules\clilib\ $PROJ_DIR$\..\..\..\src\modules\ip_applib\
Preinclude file, enter:
$PROJ_DIR$\..\all_projects.iarinc
- Diagnostics tab:
- If you encounter compilation errors related to data type conversion with older versions of the OCSDK, you may need to disable some diagnostics:
In the Suppress these diagnostics text field, enter:
Pa039,Pa050,Pe767,Go005,Pa082,Pa089,Pe167,Pe550,Pe188,Pe177
- Extra Options tab:
- check Use command line options
In the Command line options text field, enter:
--no_path_in_file_macros
--enum_is_int
- Optimizations tab:
- I
n Output Converter:Output tab:check Generate additional outputoutput format: binary
This output converter configuration is no longer needed. It produced a binary (.bin) file that was compatible with loader 1.0.3.12. It is replaced by the conversion of the .out file (as configured in the Linker output tab below) to a .bin file in the post-build step (as configured in the next step). The new binary format requires loader 1.0.5.4 or later.
- In Build Actions:
- In the Post-build command line field, enter:
C:\Python27\python.exe "$PROJ_DIR$\..\..\..\tools\dustElfToBin\dustElfToBin.py" "$TARGET_PATH$"
- In Linker:
- Config tab:
- check the Override default
In the browse field, if you are using version 7.3 or earlier enter:
$PROJ_DIR$\..\..\..\tools\linker_configuration\EternaPublic.icf
for version >= 7.4, the linker file is now bundled, so enter:
$TOOLKIT_DIR$\config\linker\Linear\DustNetworks\Eterna.icf
In the Configuration file symbol definitions text field, enter:
use_loader=1
- Library tab:
- check Override default program entry
pick Entry symbol and set to:__reset_handler
- Output tab:
- Change the Output filename field to a more descriptive filename, e.g.
ocfdk_02_adc.out.
- Change the Output filename field to a more descriptive filename, e.g.
- List tab:
- Check Generate linker map file
- Config tab:
- In Debugger:
- Setup tab:
- Driver: J-Link/J-Trace
- Download tab:
- check User flash loader(s)
- check Override default .board file
In the browse entry, if you are using version 7.3 or earlier enter:
$TOOLKIT_DIR$\config\flashloader\Dust\FlashEternaPublic.board
for version >= 7.4, the board file is now bundled, so enter:
$TOOLKIT_DIR$\config\flashloader\Linear\DustNetworks\FlashEterna.board
- Plugins tab:
- check uC/OS-II in addition to any checked plugins
- Setup tab:
- In J-Link/J-Trace:
- Connection tab:
- pick SWD
- Connection tab:
- In Build Actions:
Using the i-jet debug probe
The IAR projects in the
On-Chip Software Development Kit
are set up to use the j-link debug probe. If you are using the i-jet, you need to change your project options as follows:
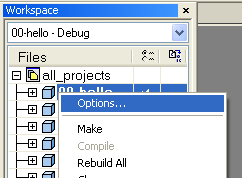
- right-click on your project and select options
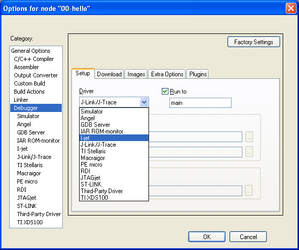
- in the options, under Debugger, Setup, set Driver to I-jet.
- The first time run the project, you will see the following message. Click OK.
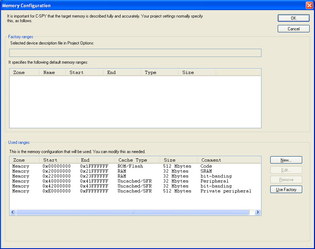
- In the Memory Configuration window, click OK.
Customizing an application
The contents of the
onchipsdk/
src/inc/, onchipsdk/
src/lib/, and onchipsdk/
src/modules/ directories are tightly linked together. We highly discourage modifying those files. Doing so will complicate upgrading your applications to a newer version of the On-Chip Software Development Kit
and may have unintended effects on other applications. Future versions of the OCSDK will make it easier to customize the modules in one project without affecting the other samples. In the meantime, If you want to customize the behavior of the local or CLI module, we suggest creating a copy with a different name. For example, to customize the local module (assuming you will make changes to the following headers):- Copy dnm_local.h to private_dnm_local.h
- Copy loc_task.h to private_local_task.h
- Copy loc_task.c -> private_loc_task.c and replace the old #include references with the new ones.
You can now edit the local task without impacting other projects.
