Analog Devices EV-Cog-AD3029LZ
- Jonathan Simon
- mahendravarman
Introduction
The EV-Cog-AD3029 ("the Cog") is a development platform for Analog Devices Ultra Low Power MCU ADuCM3029 with integrated power management for processing, control, and connectivity. The ADuCM3029 MCU is based on the ARM Cortex-M3,along with the collection of digital peripherals, embedded SRAM, flash memory, and an analog subsystem which provides clocking, reset, and power management capability in addition to an Analog-to-Digital Converter (ADC) subsystem.
SimplePublish for EV-Cog-AD3029LZ
The QSL includes a SimplePublish example for the EV-Cog-AD3029 . This is provided as an IAR Embedded Workbench project based on the BSP (Board Support Package) for the the Cog.
The SimplePublish application transmits temperature data (on-board temperature sensor of the Cog from the mote to the Manager. Debug prints are re-targeted through the ARM Mbed serial port of the Cog. An orange LED (general purpose LED) on the Cog board is also toggled to indicate whether the mote has connected to a network or not.
The example was developed on IAR Embedded Workbench IDE-ARM 7.70.1.
For more information on EV-Cog-AD3029, click on the link provided.
For more information on ADuCM3029 micro-controller, click on the link provided.
Download IAR Embedded Workbench IDE
Download and run the IAR Embedded Workbench IDE from the official download page. After installing the IAR Embedded Workbench, navigate to IAR_EV-COG-AD3029LZ - this link provides step-by-step instructions for working with Cog using IAR Embedded Workbench. The page gives instructions on how to download and work with the BSP (Board Support Package for the Cog) and links to download Mbed windows serial driver which plays a vital role as a debugger for the board.
Connection Diagram
Connect the Cog to the Mote

Figure 6: Mote connected to the EV-Cog-AD3029LZ.
The Cog is connected to the mote using the EV-GEAR-EXPANDER1Z . The EV-GEAR-EXPANDER1Z is a “Gear” (expansion add-on board) for MCU Cogs (e.g. the EV-Cog-AD3029LZ). This gear is designed for quick prototyping and bread boarding. Refer to the link provided for more details on how to integrate the Cog with EV-GEAR-EXPANDER1Z.The EV-GEAR-EXPANDER1Z is as shown in Fig.1 which is interfaced to the Cog. The EV-GEAR-EXPANDER1Z is interfaced with the Cog board and the pins needed to interace the Cog board to the mote are as shown in Fig.2. Connect the mote to the MCU as per the pin mapping in Table.1.
Long cables between the mote and the Cog may corrupt the API bus communication.
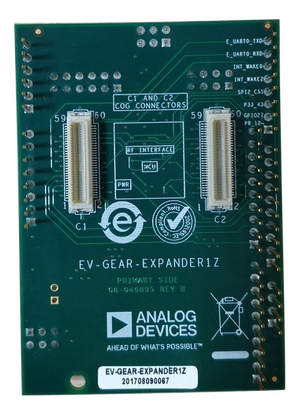
Fig.1: EV-GEAR-EXPANDER1Z(Primary Side) .
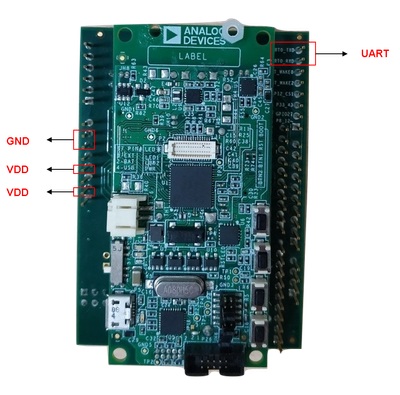
Fig.2:EV-Cog-AD3029LZ interfaced with EV-GEAR-EXPANDER1Z.
EV-Cog-AD3029LZ (using expansion add-on board) | Mote |
|---|---|
| +3V | VSUPPLY |
| GND | GND |
| E_UART0_TXD | TX |
| E_UART0_RXD | RX |
| GND | RX RTSn |
| GND | TX CTSn |
Table.1: EV-COG-AD3029LZ to mote pin mapping.
Connect Debug USB to Computer
Connect a USB cable from your computer to the USB-micro port of the Cog. This port is used to program, debug and power the board.
The debug USB appears as mbed Serial Port . Make sure to note the name, e.g. COM25 in the example pictured below, as we will open a terminal on said port to see debug prints.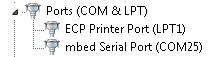
Open Debug Terminal
The SimplePublish example code will send all standard input/output (e.g. debug prints) through the serial port you identified in the previous section. Open your favourite serial terminal (e.g. PuTTY) and connect to said serial port with the following configuration:
- Baudrate: 115200
- Data Bits: 8
- Parity: None
- Stop Bits: 1
You probably have to restart the terminal whenever you disconnect/reconnect the debug USB to the COG.
You can (de)activate debug and log messages with the NDEBUG and NLOG defines in dn_debug.h (located in sm_qsl/).
Compile and Run
Navigate to the SimplePublish example directory at examples/EV-Cog-3029LZ/SimplePublish/ and open the SimplePublish.eww project file in IAR Embedded Workbench. This should open the project with everything set up for you. Since the Cog has an embedded debugger, you do not have to select any tool: IAR Embedded Workbench should detect that the board is connected via USB.
The System Workbench project expects to find the sm_clib and sm_qsl as they appear in the Directory Structure. If you chose the zip download or subversion checkout, the sm_clib/ directory from the separate unzipped folder/svn checkout need to be copied into the QSL repository to achieve the same structure.
Build
Project > Rebuild All to build the project.
Download and Debug
Now, simply press the 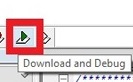 symbol to compile and run the program, and you should see prints appearing on the debug terminal you opened.