OTAP
- Thomas Watteyne
- Jonathan Simon
Concept
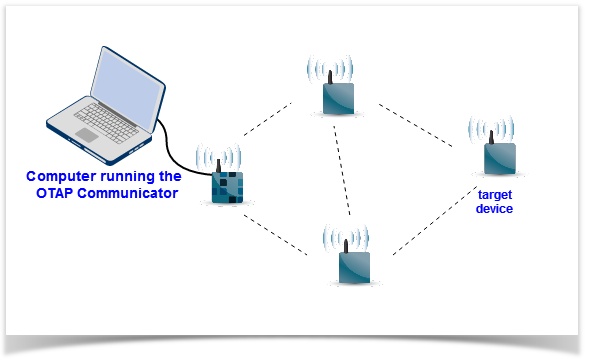
The SmartMesh network stack comes with Over-The-Air-Programming (OTAP) capability - the firmware you develop can leverage this capability. OTAP allows you to upgrade the firmware on a SmartMesh IP Mote in the network remotely, without needing physical access.
In practice, OTAP consists of two tools: the OTAP Builder tool, which builds the binary file to send to a device (and which is part of this On-Chip Software Development Kit), and the OTAP Communicator, which handles the actual transmission by connecting to the SmartMesh IP Manager.
OTAP has the following features:
- You can upgrade the firmware on either a single, a group of, or all of the SmartMesh IP Motes in your network. The OTAP Communicator implements a protocol which ensures reliable delivery of the OTAP file to the device(s).
- The OTAP procedure replaces the entire main executable of a SmartMesh IP Mote. This means that, even if the difference between old and new firmware versions is only a handful of lines in the source code, the OTAP procedure will involve loading the entire image (as opposed to dynamically linking in new components).
- Before the OTAP file is loaded onto a SmartMesh IP Mote, it is cut into numerous pieces which are sent individually. The protocol between the OTAP Communicator and the target device(s) ensures that all these pieces are correctly received and reassembled at the target device(s). This includes re-transmitting pieces that were not received correctly.
- Depending on your network's configuration, an OTAP procedure can take from several minutes to several hours.
- Before the OTAP procedure starts, a "handshake" happens between the target device and the OTAP Communicator. The target device will only accept the OTAP file if the conditions listed in the OTAP Handshake section are satisfied.
The OTAP process replaces the entire main executable running on the target device with the binary file you provide the OTAP Builder Tool. While the OTAP process ensures that that binary file is transferred correctly and securely to the target device, it does not inspect its contents. It is your responsibility to make sure that the file is a valid binary executable program.
In particular, this means that you can replace the firmware of the target device with (valid) firmware, but which does not join the network. In this case, you will not be able to further upgrade the mote using OTAP, and you will need physical access to the device to change its firmware. This can leave a network in an inoperable state.
When you have new firmware ready to be loaded onto a target device, we strongly recommend you test the complete OTAP procedure onto a number of devices in a laboratory test setting before applying it onto a production network.
Overview
The diagram below illustrates the different steps involved in an OTAP procedure. These steps illustrate how the app_v1 application is upgraded to app_v2 on a single SmartMesh IP Mote in the network.
- You need a running SmartMesh IP network to be able to use OTAP.
- In the network, we assume a mote (which we will call the "target device") is running an application called
app_v1. - At some point, you develop an new version of that application, called
app_v2. When building your application, this produces theapp_v2.binfile. - Using the OTAP Builder Tool, you can convert the
app_v2.binfile into a OTAP file calledapp_v2.otap2. This OTAP file is a compressed version of the original binary file, pre-pended with a specific OTAP header. - Using the OTAP Communicator (part of the SmartMesh SDK), you load the
app_v2.otap2file onto the target device. - The
app_v2.otap2file is sent to the target device over the SmartMesh IP network. This process involves cutting theapp_v2.otap2file into pieces and sending each piece over the network. Depending on the configuration of the network, this can take from several minutes to several hours. It is entirely automated, with the target device and the OTAP Communicator ensuring correct reception and reassembly of theapp_v2.otap2file on the target device. - When it receives the different pieces of the
app_v2.otap2file, the target device writes them to its file system. When the OTAP Communicator finishes, the target device still runs theapp_v1application, but knows that a newer version is present in its filesystem. This newer version will only be loaded when the target device reboots. - Using the manager's CLI interface, you issue a command to reset the target device remotely.
- This command causes the target device to gracefully leave the network, then reset.
- During the boot process of the target device, it replaces the old firmware (
app_v1) by the new one (app_v2) which it reads from its file system. - At the end of the boot process, the target device runs the updated
app_v2application, and the OTAP file is removed from the filesystem.
OTAP Handshake
A OTAP handshake between the OTAP Communicator (running on the computer attached to the SmartMesh IP Manager) and the target device(s) happens at the beginning of any OTAP procedure. The OTAP handshake consists of the OTAP Communicator sending the OTAP header to the target device(s). Based on the contents of that header, each target device decides whether or not to accept the new OTAP file. The OTAP procedure then takes place with the subset of target devices that have accepted the OTAP file.
The OTAP header contains the following information:
- Information about the application contained in the OTAP file:
- vendor ID
- application ID
- version
- minimum required firmware version that needs to be running on the target device
- Information about the hardware the application contained in the OTAP file can run on
- Information about the location to write the application contained in the OTAP file to:
- the partition ID to write to
- the absolute memory address to write to
Based on this information, a target device can decide whether or not to accept the OTAP file. It rejects the file if any of the following conditions apply:
- The target device receives a malformed OTAP header, which includes errors in size or message integrity code.
- The application contained in the OTAP file is too large to fit in the file system of the target device.
- The application contained in the OTAP file is too large to fit in the partition specified in the OTAP header.
- The partition specified in the OTAP header is not marked as "executable" in the partition table.
- The absolute memory address does not point to the right location in the specified partition.
- An OTAP operation is already ongoing.
- The version of the software currently running on the mote is smaller than the minimum required firmware version specified in the OTAP header.
- The hardware version specified in the OTAP file does not match the current hardware.
- The application identifier specified in the OTAP file does not match the identifier of the application currently running on the target device.
- The vendor identifier specified in the OTAP file does not match the vendor of the application currently running on the target device.
The last two tests are not run if the OTAP header contains the skip_validation flag. This flag is set if the --skip-validation switch is used when using the OTAP Builder tool.
The Over-The-Air-Programming (OTAP) procedure uses the file system to store the new binary image as it is being received.
If you plan on using OTAP, you need to make sure that there is enough free space in the file system to hold a full binary image.
We therefore recommend to:
- keep the size of the full binary image below 200kB
- keep 160kB of free space in the filesystem
- declare non-critical files to be Temporary when possible, these files will be deleted when OTAP starts in order to make more space
This is especially important when you are planning to reduce the size of the file system partition and/or creating files in the file system.
Hands-on Example
In this section, you will replace a mote running the 02-gpio_net sample application with an new version of that sample application. The update will simply consist in changing the banner which is printed when the device boots, from "gpio_net app" to "gpio_net2 app".
You can follow the same procedure with any firmware which has the node join the SmartMesh IP network.
Prepare the Environment
We assume that you have a SmartMesh IP network running, and that one of the SmartMesh IP Motes runs the 02-gpio_net sample application (see GPIO), and has joined the network. The CLI interface of the SmartMesh IP Mote should indicate that it is sending packets to the SmartMesh IP Manager.
SmartMeshIP stack, ver 1.2.1.9
  5250 : Joining
  5879 : Connected
 15544 : Active
samplePinLevel=0, sent 0x00
samplePinLevel=0, sent 0x00
samplePinLevel=0, sent 0x00
samplePinLevel=0, sent 0x00
On the SmartMesh IP Manager, retrieve the SmartMesh IP Mote's MAC address by typing the following command over the CLI interface:
> login user
> sm
     MAC                MoteId  State Nbrs Links Joins    Age StateTime
00-17-0D-00-00-3F-F6-05    1     Oper    1    23     1      0    0-00:02:43
00-17-0D-00-00-38-0F-47    2     Oper    1    11     2      6    0-00:01:47
Number of motes (max 33): Total 2, Live 2, Joining 0
Here, the SmartMesh IP Mote's MAC address is 00-17-0D-00-00-38-0F-47.
To speed up the transfer of the OTAP file from the onto the target device, you can switch the network to backbone mode (see SmartMesh IP User's Guide) by entering the following commands on the SmartMesh IP Manager, and then resetting it:
> set config bbmode 2
> set config bbsize 2
While backbone mode is useful for speeding up this hands-on test, it will only work for single-mote OTAP events and causes all motes in the network to consume significantly more energy. Backbone mode should not be used to speed up OTAP in a production network.
Modify the 02-gpio_net Sample Application
In IAR, modify the 02-gpio_net sample application by changing the string it prints in its banner. Edit the gpio_net_app.c file, and change the following text from:
   // CLI task
   cli_task_init(
      &gpio_net_app_v.cliContext,           // cliContext
      "gpio_net",                           // appName
      &cliCmdDefs                           // cliCmds
   );
to
   // CLI task
   cli_task_init(
      &gpio_net_app_v.cliContext,           // cliContext
      "gpio_net2",                          // appName
      &cliCmdDefs                           // cliCmds
   );
Compile the 02-gpio_net Sample Application
In IAR, right-click on the project and select Rebuild All.
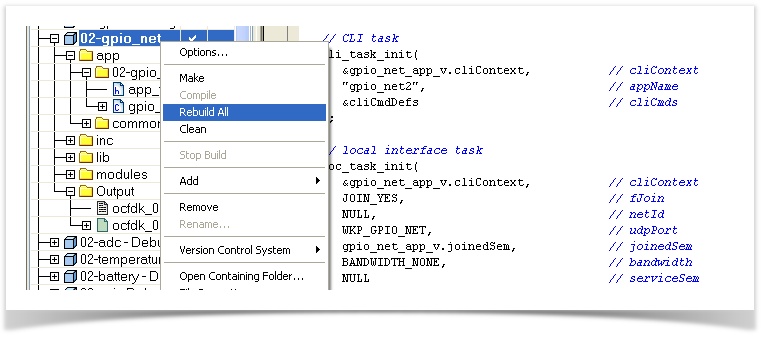
This creates the binary file in ocfdk_X_X_X/projects/iar/02-gpio_net/Debug/Exe/ocfdk_02_gpio_net.bin.
Copy this file to the ocfdk_X_X_X/tools/otap_builder/ directory.
Create the OTAP File
In a Windows command prompt, navigate to the ocfdk_X_X_X/tools/otap_builder/ directory and issue the following command.
python OtapFile.py --verbose -i ocfdk_02_gpio_net.bin -o ocfdk_02_gpio_net.otap2
--partition 2 --app-id 254 --vendor-id 0 --start-addr 0x41020 --hardware-id 3


Creating OTAP file with the following parameters:
 - infile              : ocfdk_02_gpio_net.bin
 - outfile             : ocfdk_02_gpio_net.otap2
 - is_executable       : True
 - do_compression      : True
 - skip_validation     : False
 - hardware_id         : 3
 - verbose             : True
 - input_file          : ocfdk_02_gpio_net.bin
 - start_addr          : 266272
 - vendor_id           : 0
 - app_id              : 254
 - partition_id        : 2
 - output_file         : ocfdk_02_gpio_net.otap2
 - version             : [1, 0, 0, 0]
 - depends_version     : [0, 0, 0, 0]


Read input (binary) file ocfdk_02_gpio_net.bin...
Stripping kernel header...
Compressing data...
Creating OTAP header...
Writing output (OTAP) file ocfdk_02_gpio_net.otap2...
done.
This generates the ocfdk_02_gpio_net.otap2 file in the same directory.
IDs
The hardware_id, vendor_id, and app_id can be used to target the OTAP process at a subset of devices in the network. You may select your own app and hardware IDs, but to avoid collisions between vendors, Linear is currently managing assignment of vendor IDs. Contact Linear Factory applications (ksaxena@linear.com) for a vendor ID assignment. Devices should only have different IDs when their firmware differs, otherwise you will need to do an OTAP pass for each unique combination of vendor/app/hardware IDs in the network, or use the skip_validation flag to tell all devices in the network to accept the update - note that this could render devices with incompatible firmware inoperable.
Reprogram through OTAP
The OTAP procedure requires you to have the following installed on your computer:
- The SerialMux, running and configured to the API serial port of your SmartMesh IP manager (see SmartMesh IP Tools Guide)
- The SmartMesh SDK
We will use the OTAP Communicator in the win/ directory..
First, copy the ocfdk_02_gpio_net.otap2 file to that directory. Then, in a Windows command prompt, navigate to that directory and issue the following command:
OTAPCommunicator.exe -m 00-17-0D-00-00-38-0F-47 ocfdk_02_gpio_net.otap2

Welcome to the OTAP communicator console
Loading ocfdk_02_gpio_net.otap2
Starting OTAP for ocfdk_02_gpio_net.otap2
Starting handshake with 1 motes
Handshake completed, 1 motes accepted
Starting data transmission of 1806 blocks, 1 motes left
Starting status query to 1 motes
Data complete. No motes left on incomplete list
Starting commit for 'ocfdk_02_gpio_net.otap2' to 1 motes
00-17-0D-00-00-38-0F-47 committed ocfdk_02_gpio_net.otap2 [FCS=0xae50]
Successful OTAP to:
00-17-0D-00-00-38-0F-47
Reset the Mote
You can reset the mote remotely by issuing the following command on the SmartMesh IP Manager's CLI interface:
> reset mote 00-17-0D-00-00-38-0F-47
At the target device's CLI, you can follow how the device leaves the network, reboots, then carries out the upgrade.
1892528 : Lost
starting loader
otap file found
erasing
copying
commiting
rebooting
gpio_net2 app, ver 1.1.0.2
Current config:
 - lowval:  0
 - highval: 1
 - period:  10000
SmartMeshIP stack, ver 1.2.1.9
As indicated in the banner, the target device now runs the gpio_net2 application.