ArduinoDue
- Thomas Watteyne
These examples run on the Arduino Due platform.
To run these examples, you need the following hardware:
- an Arduino Due board.
- the appropriate SmartMesh device for the sample application you want to run.
- 6 jumper cables to connect the serial port of the SmartMesh device to that of the Arduino Due.
- A micro-USB cable.
You need to download the following software:
- the
SmartMesh C Library
source code. - the Arduino IDE.
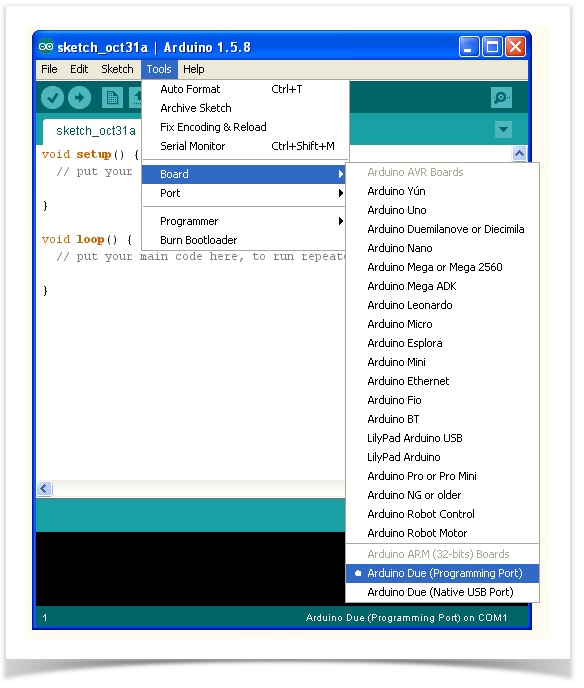
At the time of writing the default version of the Arduino IDE does not support the Arduino Due. Download the Arduino 1.5.8 BETA (or higher).
When you launch it, make sure you have the Arduino Due (Programming Port) in the Tools > Board menu.
Setup
You first need to connect the serial port of your SmartMesh device to the serial port of the Arduino Due. Although we are assuming you are using a DC9003 board, the process is equivalent for any SmartMesh device.
To avoid erroneous connections, we recommend you power off the SmartMesh device and Arduino Due boards.
Furthermore, remove the battery from the SmartMesh device. It will be powered by the Arduino Due board.
| Arduino Due pin | DC9003 pin |
|---|---|
GND | GND |
3.3V | VBAT |
TX1 | RX |
RX1 | TX |
GND | TX CTSn |
3.3V | RX RTSn |
Connect a micro-USB cable between your computer and the Arduino Due's USB port labeled PROGRAMMING.
Next, Open the Arduino IDE and specify the following directory as the Sketchbook Location:
sm_clib-X.X.X.X\examples\arduino\
Use the Sketch > Import Libraries... > Add Library... to add the following libraries to your Arduino installation:
sm_clib-X.X.X.X\sm_clib\sm_clib-X.X.X.X\examples\arduino\Libraries\IpMgWrappersm_clib-X.X.X.X\examples\arduino\Libraries\IpMtWrappersm_clib-X.X.X.X\examples\arduino\Libraries\TriangleGenerator
These four libraries (sm_clib, IpMgWrapper, IpMtWrapper, TriangleGenerator) now appear in the Sketch > Import Library... list.
You can now close the Arduino IDE, and double-click on one of the following sample applications to reopen the Arduino IDE with the right sample application:
sm_clib-X.X.X.X\examples\arduino\Triangle2manager\Triangle2manager.inosm_clib-X.X.X.X\examples\arduino\MoteBlink\MoteBlink.ino
MoteBlink Sample Application
The MoteBlink sample application interacts with a SmartMesh IP manager. It retrieves the list of SmartMesh IP motes in the network, and sends them commands to turn their blue LED on and off. When loaded onto the Arduino Due, you will see the LEDs on the motes in the network blink in a round-robin fashion.
- To run the
MoteBlinkapplication, make sure your Arduino Due is connected to a SmartMesh IP manager. - To see the LEDs blink, you need to configure the SmartMesh motes in "master" mode.
- To see the LEDs blink, you need to close the
LED ENjumper on the DC9003 board.
Triangle2manager Sample Application
The Triangle2manager sample application interacts with a SmartMesh IP mote. It drives the mote through the process of joining the network, and then periodically sends a 2-byte value (a triangle wave) to the SmartMesh IP manager.
The SmartMesh IP mote you connect to needs to operate in "slave" mode.
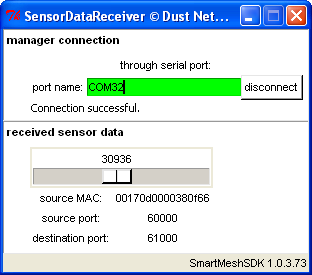
To see the data received by the SmartMesh IP manager, use the SmartMesh SDK SensorDataReceiver sample application:
- Connect your SmartMesh IP manager to your computer.
- On the computer, start the
SensorDataReceiversample application from theSmartMesh SDK, and connect that to the SmartMesh IP manager. - Load the
Triangle2manager.inosketch onto your board. - Reset the SmartMesh IP mote and open the Serial Monitor.
- On the monitor, you can follow how your SmartMesh IP mote joins the network.
- After the mote has joined, the slider on the
SensorDataReceiverapplication is set to the value the mote periodically sends. - The state machine implemented in the
Triangle2manager.inosketch gracefully handles the resets.