Requirements
Goal
clouddata.dustcloud.org allows a customer to publish sensor data to the Internet less than 5 min after having opened a SmartMesh IP starter kit
This translates into the following requirements:
- clouddata.dustcloud.org must be able to receive sensor data, and store data as timelines for 12 hours.
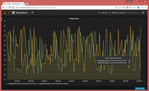
- clouddata.dustcloud.org must offer a web interface to visualize the data.
Architecture
The solution consists of the PublishToWeb SmartMesh SDK program and the clouddata.dustcloud.org server.
PublishToWeb Smartmesh SDK application
This application is part of the default SmartMesh SDK, and runs on the user's computer. It:
- connects to the SmartMesh IP Manager
- subscribes to data notifications
- forwards all the OAP temperature data readings produced by the SmartMesh IP motes to clouddata.dustcloud.org.
clouddata.dusctloud.org server
The clouddata.dusctloud.org server is built on Ubuntu Server. It has the following internal architecture:
- the iptables firewall filters out all external traffic not going to TCP port 80
- the NGINX load balancer redirects:
- HTTP requests to http://clouddata.dustcloud.org/api/v1 to the
clouddata_serverscript running on TCP port 8080 - HTTP requests to http://clouddata.dustcloud.org/ to the grafana frontend running on TCP port 3000
- HTTP requests to http://clouddata.dustcloud.org/api/v1 to the
- the
clouddata_serverscript is part of the SmartMesh SDK. It receives data from the PublishToWeb.py application and inserts it into the database. - the influxdb database efficiently stores time series data. In this example, the database is configured to automatically drop data after 12 hours.
- the grafana data visualization tools offer a clean dashboard for visualizing the data
Installation Steps
Vagrant setup files for the step-by-step guide below are maintained at https://github.com/dustcloud/clouddata-server.
Ubuntu
At the time of writing, we have installed Ubuntu Server 16.04 LTS.
If you are installing the server on a virtual machine using VirtualBox for testing purposes:
- configure two network adapters:
- Adapter 1 as "NAT" (this allows your VM to access the web)
- Adaptor 2 as "Host-only Adapter" (this allows your host OS to access the web server running your VM)
after booting your VM, edit
/etc/network/interfacesto add the last lines corresponding to the second network interfacerestart the networking services:
Once installed, log into the server.