JsonServer
This application was added in REL-1.1.1.0.
Introduction
JsonServer is a command-line (non graphical) tool that turns the SmartMesh IP Manager serial API into an JSON-based HTTP API.
It connects to one or more embedded SmartMesh IP Managers.
Description
The JsonServer application runs on the computer connected to your SmartMesh IP Manager. It offers an HTTP interface using JSON serialization to the Manager API and has special functions for interacting with the built-in sensors on motes in the network using OAP.
Setup
We assume the following setup:
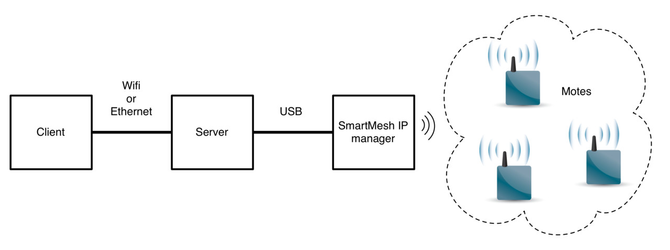
- The manager runs the default SmartMesh IP manager firmware, and is switched on.
- The motes run the default SmartMesh IP mote firmware, in master mode, and have joined the network of the manager.
- The manager is connected to the server computer. This computer will run the
JsonServerapplication. - The client is a remote computer which wants to interact with the SmartMesh IP network
server and client computers are logical roles. During this tutorial, both will run on the same computer.
Start the JSON Server
On the server, start the JsonServer application:
- by double-clicking on the Windows executable at
/win/JsonServer.exe - by double-clicking on its source files at
/src/app/JsonServer/JsonServer.py(may require additional steps on non-windows OSes)
The JsonServer application starts:
JsonServer - SmartMesh SDK 1.1.0.2 - (c) Dust Networks
The JsonServer application listens on TCP port 8080 for HTTP commands. The client needs to issue commands using a JSON format over HTTP to the server. For simple status queries, using a browser to make HTTP requests is sufficient. To issue commands containing data, an HTTP client or browser extension must be used.
Postman
Throughout the tutorial presented on this page, you will use Postman - an HTTP API client that runs on Windows, macOS, and Linux - to issue JSON requests to the JsonServer.
We assume you are reasonably familiar with Postman.
In the source code, we provide:
postman_collection.json: a Postman collection with example calls for the complete APIpostman_environment.json: a Postman environment which defines the following variablesvariable description example host hostname or IP address of the server running the JsonServer app 127.0.0.1 port TCP port that the JsonServer app is listening on, defaults to 8080 8080 serialport serial port the SmartMesh IP manager is connected to on the server COM27 mote MAC address of a SmartMesh IP mote running the default firmware in master mode 00-17-1d-00-00-38-06-45
Make sure you upload both the collection and environment files in Postman, and change the environment variables to match your setup.
Retrieve the state of the JsonServer
Issue the "02 stats/GET status" request to retrieve the current status of the JsonServer. The response contains:
{
  "managers": {},
  "current time": "11/09/2016 14:46:39",
  "JsonServer version": "0.0.0.1",
  "running since": "11/09/2016 13:49:22 (0:57:16.480000 ago)",
  "threads running": [
    "MainThread",
    "Thread-1"
  ],
  "SmartMesh SDK version": "1.1.0.2"
}
In particular, the response indicates that the JsonServer is not connected to any SmartMesh IP manager:
"managers": {},
List the active serial ports
Issue the "05 helpers/GET helpers serialports" request. The response contains:
{
  "serialports": [
    "COM28",
    "COM29",
    "COM30",
    "COM31"
  ]
}
The response indicates that there are 4 serial ports active on the server. In this example, the serial API of my SmartMesh IP Manager is the fourth entry, "COM31".
Connect the JsonServer to your Manager
Issue a "06 config/PUT config managers put" request with the following body:
{
    "managers": ["COM31"]
}
The JsonServer responds with a "200 OK" status indicating the manager was added.
You can issue a new "02 stats/GET status" request to verify the manager has been added and the JsonServer established a connection:
{
  "managers": {
    "COM31": "connected"
  },
  "current time": "11/10/2016 07:14:34",
  "JsonServer version": "0.0.0.1",
  "running since": "11/09/2016 13:49:22 (17:25:11.519000 ago)",
  "threads running": [
    "IpMgrSubscribe",
    "Thread-1004",
    "MainThread",
    "Thread-1",
    "ManagerHandler@COM31",
    "COM31_HDLC"
  ],
  "SmartMesh SDK version": "1.1.0.2"
}
List the motes in the network
The JsonServer can connect to one or more managers. It automatically discovers which motes are in each of the networks. You can issue a "05 helpers/GET helpers motes" request to retrieve the list:
{
  "COM31": [
    "00-17-0d-00-00-38-07-18",
    "00-17-0d-00-00-38-06-d5",
    "00-17-0d-00-00-38-06-ad",
    "00-17-0d-00-00-38-06-45"
  ]
}
Here, the JsonServer tells me there are 5 motes connected to the manager at COM31.
Issue the getNetworkConfig Serial API commands
Through the JsonServer, you can issue any raw serial API command through the /api/v1/raw resource. That is, to issue getNetworkConfig serial API request on the manager connected to COM31, send an HTTP post with the body:
{
    "manager": "COM31",
    "command": "getNetworkConfig"
}
The body of the response contains the serial API response of the manager:
{
  "networkId": 425,
  "apTxPower": 8,
  "ccaMode": 0,
  "locMode": 0,
  "numParents": 2,
  "channelList": 32767,
  "baseBandwidth": 9000,
  "maxMotes": 33,
  "bbSize": 2,
  "bbMode": 2,
  "oneChannel": 255,
  "isRadioTest": 0,
  "downFrameMultVal": 1,
  "RC": 0,
  "bwMult": 300,
  "frameProfile": 1,
  "autoStartNetwork": true
}
Issue the getMoteConfig Serial API commands
For serial API requests requiring additional fields, just specify them in the "fields" JSON element. For example:
{
    "manager": "COM31",
    "command": "getMoteConfig",
    "fields": {
    	"macAddress": [0,0,0,0,0,0,0,0],
    	"next": true
    }
}
Which returns:
{
  "macAddress": [
    0,
    23,
    13,
    0,
    0,
    56,
    6,
    103
  ],
  "reserved": 1,
  "state": 4,
  "isRouting": true,
  "RC": 0,
  "moteId": 1,
  "isAP": true
}
Switch mote's LED on/off over OAP
The JsonServer understands the OAP protocol natively.
The "On-chip Application Protocol" (OAP) is documented in the SmartMesh IP Tools Guide. We assume you are familiar with it.
To set the INDICATOR_0 LED of mote 00-17-0d-00-00-38-07-18, issue an HTTP PUT to URI /api/v1/oap/00-17-0d-00-00-38-07-18/digital_out/INDICATOR_0 with body:
{
    "value": 1
}
which returns:
{
  "status": "OK",
  "fields": {},
  "resource": "digital_out/INDICATOR_0",
  "method": "PUT"
}
Verify that the blue LED on your DC9003 board is on. If the LED does not turn on, check that the LED_EN jumper is closed.
Issue the same request with the following body to switch off the LED:
{
    "value": 0
}
Issue an OAP echo request
OAP includes an "echo" resource which returns an incrementing counter. You can interact with it by issuing an HTTP GET request to URI /api/v1/oap/00-17-0d-00-00-38-07-18/pkgen/echo with an empty body.
Issue it multiple times to see the counter (the "echo" field) increment:
{
  "status": "OK",
  "fields": {
    "echo": 3
  },
  "resource": "pkgen/echo",
  "method": "GET"
}
{
  "status": "OK",
  "fields": {
    "echo": 4
  },
  "resource": "pkgen/echo",
  "method": "GET"
}
{
  "status": "OK",
  "fields": {
    "echo": 5
  },
  "resource": "pkgen/echo",
  "method": "GET"
}
in addition to what we have seen here, the OAP protocol allows you to:
- see the version of the application running on the mote
- specify the IPv6 address notifications should be sent to
- get/set the state of GPIO pins and enable automatic notifications on change
- read the value of the ADC pins, and enable periodic notifications
- read the temperature, and enable periodic notifications
- trigger the generation of a number of (dummy) notifications to generate arbitrary data in the network for testing purposes
All of these can be done though the JsonServer application and are present in the Postman collection.
Receive Notifications
The SmartMesh IP manager generates notifications on its serial port (data received from motes, networking events, etc). The JsonServer application translates each notification into a JSON string and performs an HTTP POST with the JSON body to a configured URL. The URL to which each notification is sent is configured by the user for each type of notification. By default, it is http://127.0.0.1:1880, the default URL of a Node-RED instance running on the same computer as the JsonServer.
| Notification type | Default URL | Description |
|---|---|---|
| event | http://127.0.0.1:1880/event | Event notification |
| hr | http://127.0.0.1:1880/hr | Parsed health report notification |
| oap | http://127.0.0.1:1880/oap | OAP notification from a mote |
notifData | http://127.0.0.1:1880/notifData | Data notification from a mote |
| notifIpData | http://127.0.0.1:1880/notifIpData | IP Data notification from a mote |
| notifHealthReport | http://127.0.0.1:1880/notifHealthReport | Health report notification |
| notifLog | http://127.0.0.1:1880/notifLog | Log notification |
The URL that each of the notifications are sent to is part of the configuration of the JsonServer. You can get/set it through the /api/v1/config resource.
The NotifReceiver.py script shows the notifications sent by the JsonServer.
The NotifReceiver.py script listens for notifications on the same default port as the Node-RED server. Only one of these applications can be listening for notifications at a time.
Run NotifReceiver.py and observe the notifications that it prints out. Motes with the default firmware should generate OAP temperature notifications every 30 seconds. For each temperature notification, two notifications, /oap and /notifData will appear in the NotifReceiver output.
Bottle v0.12.10 server starting up (using WSGIRefServer())...
Listening on http://localhost:1880/
Hit Ctrl-C to quit.


================================================================================
method: POST
path:   /oap
body:   {   u'fields': {   u'channel': [5],
                   u'channel_str': u'temperature',
                   u'num_samples': 1,
                   u'packet_timestamp': [262572119296, 95553792],
                   u'rate': 30000,
                   u'received_timestamp': u'2016-11-14 17:37:42.916559',
                   u'sample_size': 16,
                   u'samples': [2764]},
    u'mac': u'00-17-0d-00-00-38-10-e0',
    u'name': u'oap'}

127.0.0.1 - - [14/Nov/2016 17:37:42] "POST /oap HTTP/1.1" 200 0
================================================================================
method: POST
path:   /notifData
body:   {   u'fields': {   u'data': [   0,
                                2,
                                5,
                                0,
                                255,
                                1,
                                5,
                                0,
                                0,
                                0,
                                0,
                                61,
                                34,
                                132,
                                149,
                                0,
                                5,
                                178,
                                9,
                                0,
                                0,
                                117,
                                48,
                                1,
                                16,
                                10,
                                204],
                   u'dstPort': 61625,
                   u'macAddress': u'00-17-0d-00-00-38-10-e0',
                   u'srcPort': 61625,
                   u'utcSecs': 1025672341,
                   u'utcUsecs': 373250},
    u'manager': u'COM27',
    u'name': u'notifData'}
Stop the JsonServer application
To close the JsonServer application, simply close the command prompt window.
The application saves its configuration in the JsonServer.config file, so the next time you start it, it resumes with the same configuration.